How to Change PHP Settings in your Hosting Account
PHP is a scripting language used primarily on the web and is available on our shared, VPS, and Dedicated servers. PHP is highly customizable and has many settings that our users can modify themselves. This article will advise you how to change PHP settings in your php.ini file.
How to view your current PHP settings
To view your current PHP settings, create a PHPinfo page. If you’re not sure how to do this, please see How can I view my PHP settings using a PHPinfo page ?
The steps in updating the values listed in your PHP info page depend on how PHP is setup on your particular server. In general, PHP runs on our servers as either:
To find out how PHP is configured on your server, create a PHP info page (via the above instructions) and look at the “Server API“‘ value. If the “Server API” is “CGI“, then PHP is running as “CGI module”. If “Apache” is listed, then your server is running PHP as an “Apache module”.
Server API: Apache
If your server runs PHP as an “Apache module“, you can change your PHP settings via a .htaccess file. A .htaccess file is a configuration file you can create and use to change many server settings, including PHP settings. The basic syntax to use in your .htaccess file for updating PHP settings is:
php_value Directive value
For example, if you wanted to change the max_input_time from 60 seconds to 120 seconds, add the following to your .htaccess file:
php_value max_input_time 120
After making this change, refresh your PHP info page, and you should see the changes. If you receive a 500 error, please double check the syntax you used as you may have made a misspelling.
If you don’t have a .htaccess file, you can simply create a new file named .htaccess. As the .htaccess file begins with a dot (.), it is considered a hidden file. If you are using the cPanel’s File Manager, please be sure to select the option to Show Hidden Files (dotfiles), otherwise you will not be able to see your .htaccess file. If you do not see this prompt when opening your File Manager, click the, “reset all interface settings” link at the bottom of your cPanel to reset your File Manager settings.
Server API: CGI
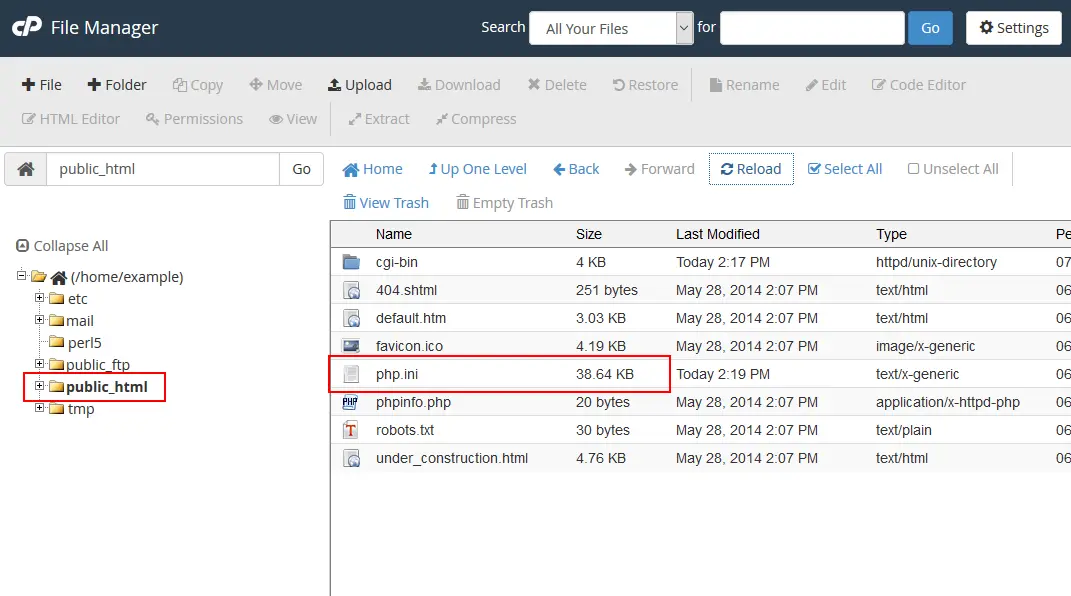
View of the php.ini in the File Manager
If your server runs PHP as a CGI module, you can change your local php.ini file in order to make modifications to your PHP setup. php.ini is a PHP configuration file with a list of PHP directives and their values. In the above example, we modified the max_input_time value. If you open your php.ini file and search for max_input_time, you should see something similar to:
;;;;;;;;;;;;;;;;;;;
; Resource Limits ;
;;;;;;;;;;;;;;;;;;;
 max_execution_time = 30
max_input_time = 60
memory_limit = 256M
upload_max_filesize = 10M
To change the max_input_time from 30 seconds to 120, for example, simply change 30 to 120 and save the file. Refresh your PHP info page, and you should see the changes.
Increasing PHP memory in the php.ini
A common issue when using free open source software or other PHP intensive programs is the “exhausted memory” error. If you have a PHP memory error on your site, you can increase the memory limit PHP uses for the scripts. To learn how to change the memory limit in your php.ini, please see the following link.
Fixing the Allowed memory size exhausted error
Modifying the PHP.INI file
Here is a quick step-by-step tutorial on editing the PHP.INI file.
- Login to the cPanel.

Find the File Manager in File section of the Cpanel. Review our tutorial on using the Code Editor within the File manager if you’re looking on information how to use it.
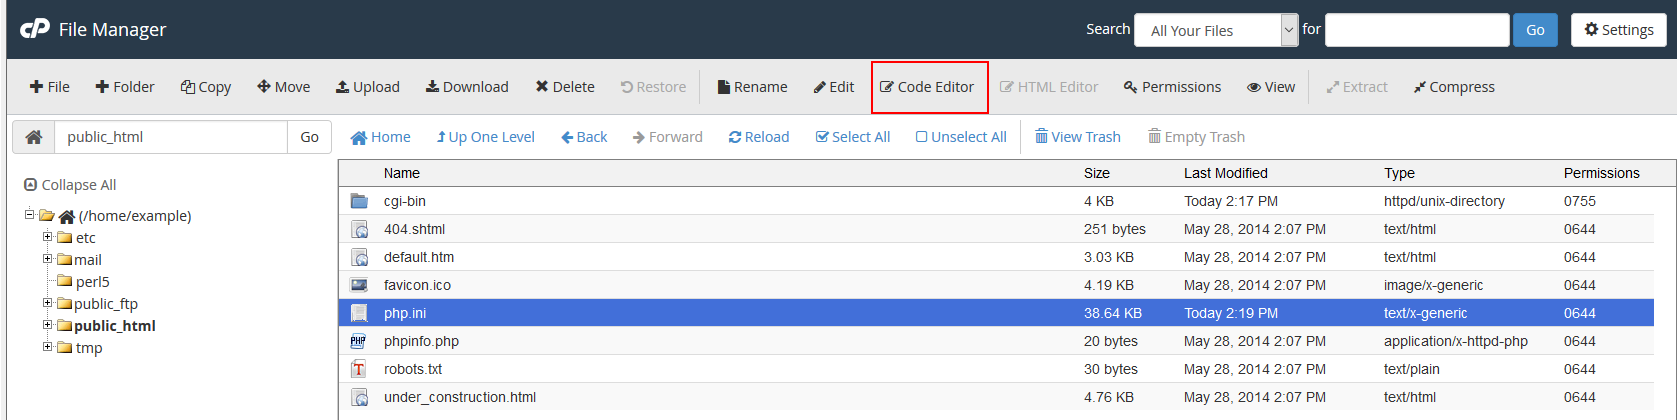
Navigate to the directory where you will either save or edit the PHP.INI file and then select the file and use the Code Editor. To open the file, you can click on it to select the file and then click on the Code Editor icon in the menu bar of the File Manager. You can also right-click with your mouse and select Code Editor from the menu that appears.
- Edit the section of the PHP.INI that you wish to change.
- Click on SAVE CHANGES in the top right hand corner in order to save your modifications or additions to the file.
Common Problems when Updating your php.ini file
I don’t have a php.ini file!
Only users running on a server with PHP loaded as a “CGI module” will have a php.ini file. The php.ini file by default will be located at public_html/php.ini. If you do not see a file named php.ini in your public_html, please contact our Support Department and request that we create one for you.
I made changes to the php.ini file, however I do not see the changes!
The php.ini file is not recursive. Updating your php.ini values in public_html/php.ini will not affect PHP files in subfolders of your public_html, such as public_html/staff. To correct this problem, you can make your php.ini file recursive so that it affects all sub folders. More help on this can be found in How can I make my php.ini file recursive?
Considering a VPS or Dedicated Server?
With a VPS or dedicated server, a site owner can truly customize the server to their exact specification. If you are on a Shared Hosting account, and are thinking about upgrading from to a VPS or dedicated server, click here to read more about a VPS vs dedicated server.
 Telnet Definition[/caption]
Recent Comments