Hosting

Differences between Shared, VPS, and Dedicated Hosting

Differences between Shared, VPS, and Dedicated Hosting

With all the different types of Web Hosting available, it can be confusing as to which one is right for you. Do you choose shared hosting, a VPS, or a Dedicated server? In this article, we will cover the basics of the different types of Web Hosting plans so you can find which type is the right one for you.

Hosting Platform Analogies

Shared Hosting
Shared Hosting is very similar to living in an Apartment Complex. All residents are in the same location and must share the available resources with everyone including the pool, parking lot, and playground. In shared hosting, all accounts must share the available resources with all the other accounts on the server. These include CPU time, memory, and disk space. Our System Administrators monitor all of our shared servers 24/7.

VPS Hosting
VPS Hosting includes our 4GB, 6GB, and 8GB plans and is similar to owning a Condo. While you still share things on the property, you are ultimately responsible for maintaining your own property and repairs inside the condo. There are also significantly fewer residents per building.

On a Virtual Private Server, not all resources are shared. The overall CPU time and memory are shared across all accounts on the machine, but at the same time, portions of those resources are always dedicated to each account. This allows for more power and flexibility than being on a shared account. (Click here to download a PDF with more information.)

Dedicated Hosting
Dedicated Hosting includes our Essential, Advanced, and Elite Dedicated Server Hosting Plans. Dedicated Hosting can be compared to owning a house. You have access to all the resources available on the machine and no one else’s account resides on the machine (your house). (This PDF gets into the nitty gritty of Dedicated Hosting.)

Apartment living to Condo living

Upgrading from Shared to VPS Hosting

Shared accounts are great for most users as you can host all sorts of applications on them (such as WordPress) and there are plenty of email accounts to go around. If you compare Shared Hosting to Apartment living, a need for an upgrade may arise if you have:

  1. A Growing family: If your family grows more than what your apartment can handle, then it may be time to upgrade. In shared hosting, if your website becomes popular, you may need to upgrade to VPS Hosting for more CPU and Memory for your account. This will allow you to handle all the new traffic coming to your site.
  2. Customizations: If you love the color red and want to paint your walls red, you may not have permission to paint any walls if you live in an apartment. Moving up to a Condo gives you more ownership of your space, allowing you to paint and decorate however you choose. If you require software that is not available in Shared Hosting, uUpgrading to VPS hosting will allow you to install any software that you would like!

Condo Living to Single Family Home Living

Upgrading from VPS Hosting to Dedicated Hosting

Keeping with the Condo analogy, you have a lot of control, but you don’t have complete control. There are many reasons that a Condo was great for you at one point in your life, but you’re at the point where you have a big family and there’s a lot going on every day. You may decide to buy a single family home, where you’ll have plenty of parking and extra bathrooms.

VPS Servers are great for mid-sized businesses because you have a virtualized private server that you can setup and tweak exactly the way you want. A VPS Server is not a Dedicated Server, however, so you are still on a server with other users and your actions can negatively affect them. For example, if you have a very busy website, dominating the server’s CPU time and memory could cause performance issues with other users on the same server.
Hosting

How to install Composer on shared servers

How to install Composer on shared servers

Composer is a tool for dependency management in PHP. It allows you to declare the libraries your project depends on, and it will manage (install/update) them for you. Composer is not a package manager in the same sense as Yum or Apt are. Yes, it deals with ‘packages’ or libraries, but it manages them on a per-project basis, installing them in a directory (e.g., vendor) inside your project. By default, it will never install anything globally. Thus, it is a dependency manager.

To install Composer:

1. SSH access should be enabled for your hosting account with us. Follow the steps provided in this article to switch SSH access on.

2. To access your account via SSH, download and install one of the available SSH clients. You can find the list of free SSH clients here. In case you are using a Unix-based OS (Linux or OSX), you can easily run the Terminal application and connect to the server using the command:

ssh username@servername -pPORT

ssh – command for logging into the remote server
username – your cPanel username
servername– name of the server where your hosting account is located (you can find it using this tutorial)
PORT – connection port – 21098 for a Shared Hosting servers, 22 – for a VPS/Dedicated server 

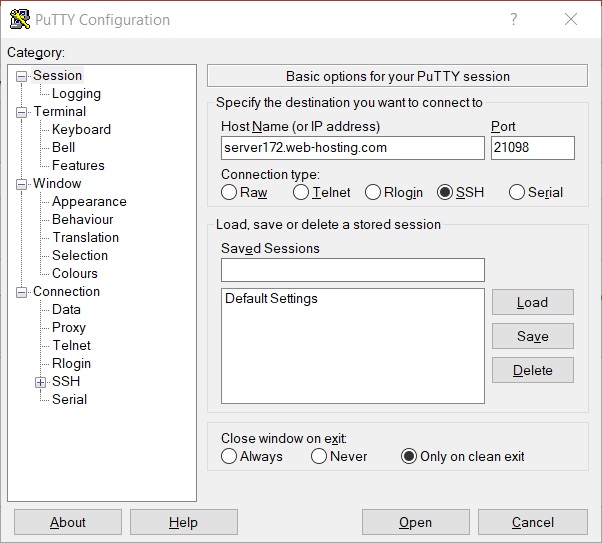
3. Open your SSH client, put your domain name or the IP address of the server into the Host Name field, enter 21098 or 22 into the Port field, choose SSH as your connection type and press the Open button:

How to install Composer on shared servers
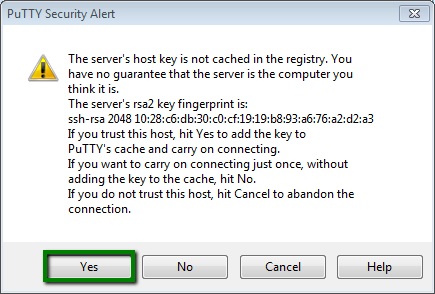
4. If you receive PuTTY Security Alert, press Yes:
How to install Composer on shared servers

When prompted, enter your cPanel username and password (when you enter the password, it is automatically hidden for security purposes):

How to install Composer on shared servers

5. Composer requires PHP 5.5+ version, so we need to check whether the needed version is set up. Type the php -v command in PuTTY (or in Terminal) and you will get the following output:

How to install Composer on shared servers

6. If you need to change PHP version, log in to your cPanel, navigate to Software and Services section >> Select PHP Version menu:

How to install Composer on shared servers

7. Select 5.5-7.2 version from the drop-down menu and then click on the Set as current button:

How to install Composer on shared servers

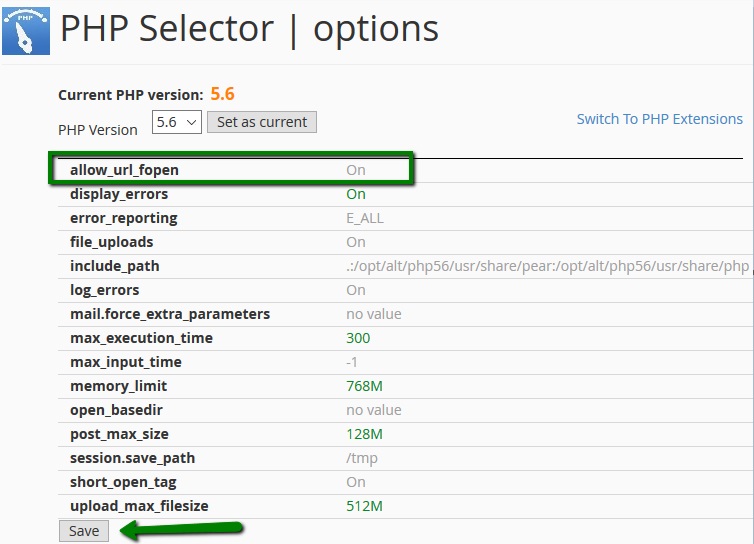
NOTE: Composer requires allow_url_fopen. It is enabled by default for all php versions on our shared servers. Still, you may check if it is On by going to Switch to PHP Settings in Select PHP version menu:

How to install Composer on shared servers

You can also find additional information about PHP selector here.

8. Next, navigate to the folder you want to install Composer in. In our example, we will install Composer in public_html:

cd public_html

How to install Composer on shared servers

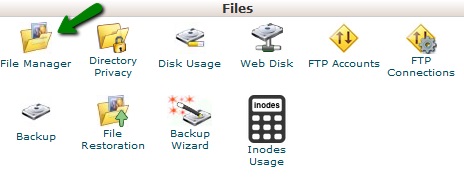
9. Now, you will need to find or create the php.ini file and some values to it. Log in to cPanel and navigate File Manager menu:

How to install Composer on shared servers

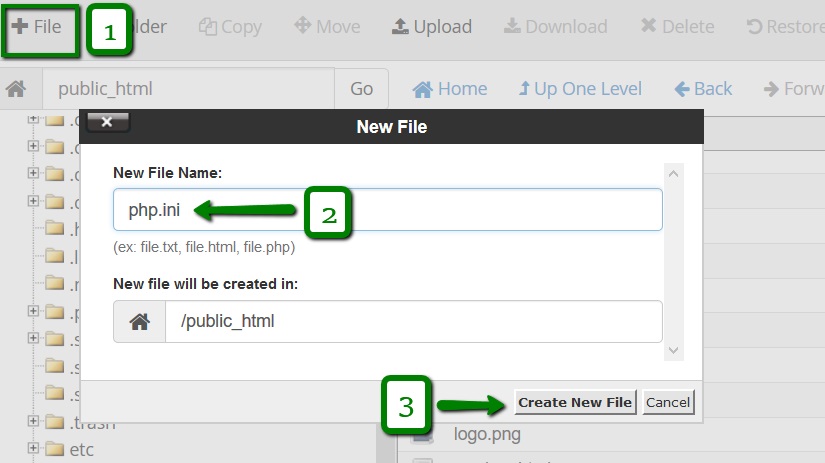
10. Go to the folder your Composer will be installed in and create a new file named php.ini using the +File button:

How to install Composer on shared servers

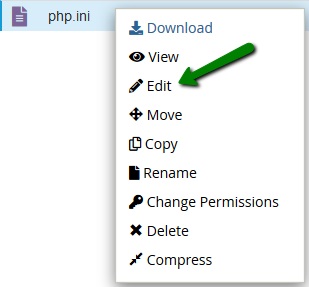
11. Open it by right-clicking the created php.ini file >>  Edit:

How to install Composer on shared servers

12. Then add the following values to the file and hit the Save Changes button:

max_execution_time = 300
max_input_time = 300
memory_limit = 512M
suhosin.executor.include.whitelist = phar
detect_unicode = Off

How to install Composer on shared servers

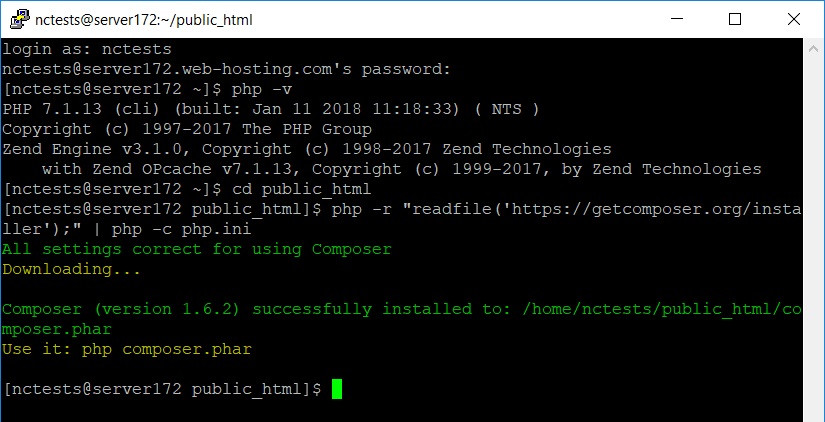
13. When all the preparations are done, you are ready to install Composer. Open PuTTY window where you have logged into your cPanel account and fill in the following command:

php -r “readfile(‘https://getcomposer.org/installer’);” | php -c php.ini

This will execute the Composer installation:

How to install Composer on shared servers

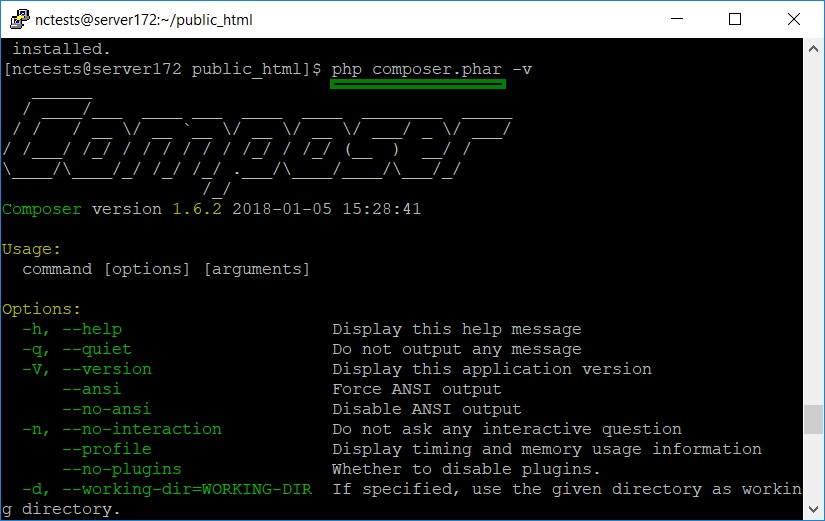
To run composer commands use:
php composer.phar

How to install Composer on shared servers

In case you get a notification Some settings on your machine make Composer unable to work properly, make sure that the PHP version is 5.5 or higher and all the changes in the php.ini file are saved.