Hosting

Install WordPress on Windows hosting in different control panels

Install WordPress on Windows hosting in different control panels

Content management systems are one of the revolutionary elements in the web. Systems that allow you to manage your website in a very simple way and use a separate platform in such a way that you have a comprehensive, beautiful, and functional site. In this tutorial, we are going to examine the installation of WordPress on Windows hosts. In this review, we will discuss how we can install and use WordPress on the various control panels that are provided to control the resources of a Windows host. Before that, we will review the Windows hosts and the cases and tips about it. We are here with Jujuhost Blog to learn how to Install WordPress on Windows hosting in different control panels.

What is a Windows host?

Before explaining how to install WordPress on Windows hosting, it is better to talk about what Windows hosting is and what it does for you. Windows hosting can be introduced as one of the types of services offered in hosting, which for some reason has relatively few fans. But if we look at it economically, it becomes a good option.

There are several reasons for the low popularity of these hosts, one of the most important of which can be the lack of application control panels like other services. When you use other options such as Linux hosting and WordPress hosting to launch your site, it is possible to use powerful control panels such as Cpanel or DirectAdmin for your work, by which you can easily and with a few clicks management system Launch WordPress content and enable other services such as auto-send email.

However, Windows control panels may remain a little unknown. In addition, on Linux hosts, you will be able to enjoy good processing for languages ​​like PHP. But in Windows, this feature is a bit dim, and maybe the performance of Windows hosts with the same resources that work well for Linux hosts, in these hosts a little trouble.

Of course, the use of Windows for web services is not marginal at all, and if you pay attention to higher-class services such as VPS or the same virtual server or even a dedicated server, the prominent role of Windows to create virtual machines that can use these resources. Had the maximum, it will be quite clear.

So in general, if we want to comment on Windows hosting, we can say that it is a good service that provides hosting using the Windows platform and the facilities that it provides to you, and it is generally a virtual machine, which is for Items where you have used ASP are a perfectly ideal option. But there are better options for using PHP-based items. Installing WordPress on Windows hosts is one of the things that may seem a little strange at first. But in the following, we will discuss the ways to do this.

Install WordPress on Windows hosts

When it comes to installing WordPress on Windows hosts, many people think that this will be done if you install WordPress exactly on Windows hosts. But this image is wrong. Of course, you can use a Windows virtual machine to manage your hosting resources, but the best way to control these resources is to use a control panel to upgrade these resources.

There are many control panels that you can use to manage your Windows hosting resources. Installing WordPress on Windows hosts will also be possible through these control panels and you can do it. Of course, in some control panels such as Plesk with a few simple clicks and in others such as Websitepanel you will encounter a little more complexity. In the following, join us by introducing three popular control panels and also examining how to install WordPress on Windows hosts in these control panels.

Install WordPress on Windows host on Plesk

Plesk Control Panel is a professional and cross-platform control panel. It works on both Linux and Windows operating systems. Therefore, it is used as one of the popular platforms and allows you to learn it, you can use both Windows and Linux hosting. This professional control panel was first launched in Siberia, Russia, and has continued to evolve into a global platform whose development and development are now simultaneous in several countries, such as Canada, Japan, and Russia itself. will be done. Installing WordPress on Windows hosts using this control panel is a relatively simple process.

To install WordPress on Windows hosting using Plesk, you must first log in to your Plesk control panel and select the Domains option from the hosting service section.

After selecting this option, click on the domain you want to activate WordPress and select it.

After selecting the domain, you must select the Application option, which is visible with the gear icon on the right.

After selecting this option, you can search for WordPress from the panel provided for applications and plugins and find the version you want. To install WordPress on a Windows host, just click Install and wait for the installation to complete.

To ensure that WordPress is installed on Windows hosts correctly, you will be able to restart the server once. But if you do not do this, there will be no problem and you can access your WordPress site panel and implement the relevant settings through it.

Install WordPress on Windows hosts using WebsitePanel

WebsitePanel can be introduced as one of the basic resource control options in Windows. Maybe it can be introduced as the best. Those who have worked with large services such as cloud services and virtual desktops have certainly heard the name of this powerful control panel. What WebsitePanel gives you is actually complete control. Control everything you have. To install WordPress on Windows hosts, but this complete control may be a little troublesome and you will need to do more steps. The steps will be as follows:

To install WordPress on Windows hosting, in the first step, you must provide the necessary infrastructure for it. So in the first step, you have to create a database for it. You can build the database through the database icon. The database you need to install WordPress on Windows hosts will be MySQL. When you want to create this option, all you have to do is go to the control panel section of the Database menu and follow the task of creating the database.

This control panel will not confuse you because you will definitely be familiar with Windows. If you have worked with Windows, then we must say that you will not be a stranger to WebsitePanel. To install WordPress on a Windows host with this control panel, you must do exactly the same as installing WordPress on a local. There you downloaded the program and copied it to your localhost folder. WebsitePanel will be the same.

To install WordPress on a Windows host, you must first download the version of WordPress you want and unzip it. You can then send the files to your Windows host using FTP. After doing this, you must complete the Wp-config.php file information according to the new database you created. For this edit you have to enter new information about the new database in the defined field.

After that, all you have to do is go to your desired address and continue installing WordPress, just like local hosting there. Information about the web server as well as some information about the database is completed in this section.

When this is done, we can say that WordPress installation on Windows hosts has been completed through the WebsitePanel control panel.

Install WordPress on Windows host in SolidCP control panel

SolidCP is one of the most popular control panels for Windows hosting control, which provides you with a great graphical control panel that allows you to install and use many programs as plugins. This control panel is known as a completely free control panel, it will provide you with excellent facilities for controlling multiple servers simultaneously.

Read more: WordPress installation tutorial on Xampp and localhost
To install WordPress on a Windows host in the SolidCP control panel, you must follow a combination of the previous two methods. You must first click on the Database menu among the SolidCP menu options on the left and enter the settings to create a new database. Next, you need to create a new database on your Windows host. When you use SolidCP, your database will be SQL Server type.

After creating a new database, you must configure it and create a new user. Keep in mind that after doing this, you must remember the Username as well as the Password for the next steps and enter them in the WordPress you are installing.

After completing the database to install WordPress on Windows hosting, you should go to the Web App Gallery section. In this section, you can search the WordPress name to display the latest update in the list of programs you can install. After installing the WordPress program, we can say that the installation of WordPress on your Windows host is done completely using the SolidCP control panel.

As we have seen, by using the control panels that are responsible for controlling the resources as well as the management of Windows hosting, you will be able to install WordPress on Windows hosting completely, but it would be wise !?

Is installing WordPress on a Windows host the right thing to do !?

In this tutorial, we taught you the best ways to install WordPress on Windows hosts. But is it right to use a non-native platform that is not optimized for Windows on a Windows host !? The answer to this question can definitely be no.

If you want to use the WordPress content management system correctly and efficiently and your WordPress is the WordPress that everyone is defining, you should consider using a host that is optimized for this. A Windows host has focused more on Asp compatibility, and handling and managing this volume of php files will definitely be difficult for this type of host.

If you want to use WordPress as a good program to permanently manage the content of your site and you want your site to provide good quality to your visitors, it is better than a WordPress host or Linux host with Use LightSpeed ​​Web Server to do this.

Conclusion

Installing WordPress on Windows hosts is an easy task, but depending on what control panel you use, how and for how long it can be done. Installing WordPress on Windows hosts is quite possible and your WordPress will work for you, but it can definitely be said that it is not the best. If you want to use this content management system, we recommend Linux hosting.


Hosting

8 essential points for choosing the right hosting

8 essential points for choosing the right hosting

8 essential points for choosing the right hosting

In the article Introducing Hosts, we discussed the concepts of hosting and the types of hosts. We have already promised to examine the method of selecting the right hosts in separate articles. Now in this article we will try to examine the points that need to be known to choose the right host.
Choosing a good hosting company

The first step in choosing the right host is to find a reputable hosting company. So that the company can meet the needs of websites in terms of security, speed and resources and have appropriate support services.
To choose the right hosting company, pay attention to the following:

1- Company credit

Is the hosting company you are considering a reputable company with the necessary standards for hosting? Prior to hosting, make sure that you are able to maintain the company and fulfill your obligations, use skilled and technical manpower, use up-to-date systems, and… in the hosting company.

2- Server and host security

Security is always an important concern when it comes to site maintenance. As mentioned earlier in the article The Most Important Website Security Threats, Hosting is essential to maintaining a secure website. Sometimes we increase the security level of our website by observing security tips, but we get harmful attacks through vulnerable hosts.
Note that security refers to both physical security and software security.
It is important to keep the servers in a safe place under the supervision of the security forces, to strengthen the space against various events (floods, fires, earthquakes, etc.), to get help from monitoring and reconnaissance systems, and to maintain the physical security of the servers.

3- Quality and reliability of the hosts

An important point to consider is the quality. Using the right environment to maintain servers, powerful hardware systems, powerful software to manage and scan servers, as well as hosting fewer websites per host will increase the quality of the hosts.

4- Presenting different plans

A good hosting company should have different types of hosts with different plans to be able to meet customer needs at any level. Check if this company is right for you when you need more resources? Is the host you provided upgradeable? Paying attention to these tips will help you solve the problem without worrying when your website needs more resources.

5- UpTime

Get hosting companies that bring your site down to zero. If your site is up and running 24 hours a day, 7 days a week, site visitors will not have a problem viewing your site and will feel more confident. Usually, a host with an uptime below 99% is no longer considered a suitable host.
Choosing a host with a high percentage of stability is an important point in SEO training and site optimization that Google always pays attention to in order to rank websites.

You can use server monitoring tools such as uptime robot to find out how long your site uptime is.

6- Customer support and services

One of the most important points in choosing the right host is paying attention to the customer service of the hosting company. A good company must be accountable to its customer 24 hours a day, 7 days a week. Their answers, while maintaining politeness and respect, should be satisfactory and instructive for the customer. Suitable means of communication to communicate with the company such as telephone numbers, online chat system, tickets, emails, etc. are available. Also, the company’s expert staff must be able to be accountable in the shortest possible time.

To ensure the proper support of a hosting company, it is enough to contact them during non-office hours and ask them for advice on buying hosting!

7- Support for multiple addon domains

A domain is the ability to launch multiple websites with different domain addresses and content on the same host. If, after launching your website, you decide to launch one or more other websites, you will no longer need to buy new hosts.
So it is better to use a host that supports domain names.
There are companies that allow users to launch a large number of websites on a shared host, in which case the quality of the hosts is usually reduced.

8- Information about control panels

The control panel of the hosts is the software with which you can control (to the extent given to you) the purchased hosts.
Note that if you are new, get a host whose panel has the right graphical appearance and enough forums to answer your potential problems. The cpanel control panel is usually one of the most popular control panels.

Choosing the right host for your website

With the help of the 8 mentioned items, choose a suitable hosting company. Then you need to find the right host for your website.
In this regard, pay attention to the following points:

1- Site programming language

To choose a host, first check the language in which your website is programmed. If you have used asp.net to program your site, you must use Windows hosting and sql server database. Of course, Windows hosts also support php and mysql, but due to the higher cost of windows hosting and more compatibility of php language with Linux hosting, use Linux hosting to use this language.

2- The need for resources

Hosting companies usually put different plans in front of their customers. You first get the amount of bandwidth consumed, the total size of the website files, the number of sub domains required, and و and choose the right plan for you according to the resources you need.
Note that as time goes on and your website progresses, this plan may no longer meet the needs of your website. So your chosen plan should be scalable so that if you need more resources you can upgrade your plan without worry.

3- Host prices

Check the prices of different hosts and choose the host that does not have high financial pressure for you. The price of the host should be such that you can renew it and do not worry about it.
On the other hand, below-reasonable prices are not reliable. Sometimes companies try to reduce costs by using weak hardware, launching a large number of websites on one server, or even shutting down the night shift force, etc., which are to the detriment of website managers.

4- Backup preparation

Usually the backup time is different in the plans. Be sure to use a host that has regular backups at regular intervals.
In addition to hosting company backups, try backing up your website yourself so that you can restore the site to its original state when you encounter a problem.
In this article, as a guide to buying hosts, we tried to express tips for recognizing a reputable hosting company and choosing the right host.

Hosting

What is the difference between a virtual server and a dedicated server?

What is the difference between a virtual server and a dedicated server?

You may experience a slow display speed after your website has been loaded on a shared service for some time. On the other hand, due to the crawl of the site pages (Crawl) by search engines, high traffic enters the host server, but you see frequent interruptions on the site. By reviewing the causes of these issues with your site administrator or hosting company, you will receive the answer that your current hosting service needs to be changed and you will be offered a dedicated server.

What is the difference between a virtual and a dedicated server? Dedicated servers are offered in two main types: virtual dedicated server and dedicated server, which will be selected by the user depending on the needs of the website in terms of performance, hardware power, cost, and so on.

When your website runs out of resources and you receive a dedicated server offer from your host, the question that comes to mind is what is the difference between a dedicated server and a virtual server? Which one is more suitable for hosting my website? Together in this article, we will answer these questions.

Virtual server a small and separate world

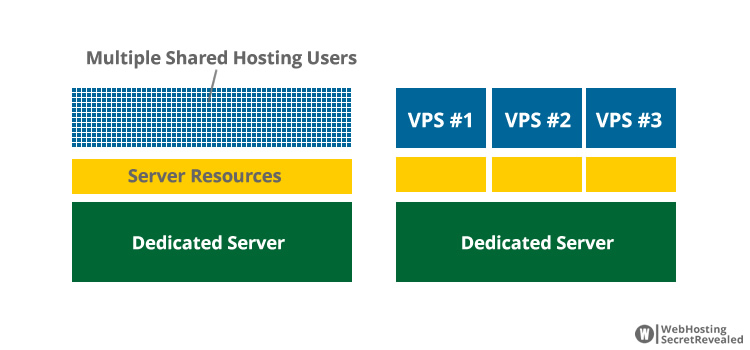
With a dedicated virtual server you will have your own small world. Imagine living in a luxurious and large unit of a residential complex. You live in an independent unit with its own facilities, but you are ultimately a member of a large complex. In this complex, you will share with other residents of the unit to travel or use the elevator in accordance with its rules. The virtual server, with the type of configuration it has, is just like this luxurious and seemingly independent unit. In some cases, it acts like a shared hosting in which several websites (which are virtual machines here) are hosted on the same server. Virtual machines, such as residents of integrated units, share resources with the host server in sources such as electricity, network cards, and the Internet. In virtual servers, other users use the resources of the host server with their own virtual machines. The number of these users is much less than the websites of a shared server, and thus more hardware resources are provided to virtual servers.
A hosting company can manage the resources of a dedicated server for multiple smaller servers. Virtual machines are allocated to multiple virtual machines (VMs) through virtualizers such as Hypervisor, Vmware, and hardware resources available on a dedicated server, creating virtual machines with unique features and capabilities. If you wish, you can read the article What is VMware.

Dedicated server resources are completely at your disposal.

In a dedicated server, resources are provided to your website or software in a completely dedicated way to put whatever you like on it, and none of the server features will be shared with the user or another server.

How to manage the service provided to users on dedicated servers is exactly like virtual servers. This means that the user can connect to the server operating system and manage it using the remote management tool. But in terms of hardware resources, there is a major difference between virtual and dedicated servers. Dedicated servers, unlike virtual servers, do not have restrictions on hardware resources. In this way, a server is physically and completely provided to the user and can manage it as he wishes. There are no restrictions on the use of resources for dedicated users on dedicated servers, and the user will use them as long as the server hardware has the processing power.
Dedicated server benefits:

One of the most prominent features of a dedicated server is its power and high performance.
Dedicated servers are the most important level of hosting in the world.
Lack of resources on a dedicated server does not make sense and can be upgraded if needed.
If optimistic performance is a high priority for you, a dedicated server is a good option.
It is possible to create multiple virtual machines on a dedicated server.
Some users prefer to host their website in a high-security private environment, in which case it is recommended to provide a dedicated server.

Differences between dedicated and virtual servers:

In terms of the cost of providing a virtual server is less than a dedicated server.
A dedicated server has very high resources compared to a virtual server. Finally, the virtual server is shared with other machines in some sources, such as power or network cards. It has nothing in common with a dedicated server.
Installing custom operating systems on a virtual server depends on the images of them hosted on the host server. If it is possible to install all versions of the operating system on a dedicated server.
As mentioned earlier, a dedicated server can be divided into smaller virtual machines and each machine can be used for one function. If this is not possible in a virtual server.
In case of need and any disruption, the transfer to another server in the virtual server will be much faster than the dedicated server. Virtual servers have more flexibility in this regard and can be easily transferred to another server.
Hardware power on a dedicated server is higher due to the lack of subscription and limited resources such as CPU, main memory, and data storage space.
When other users do not have access to a dedicated server, there is higher security for its information.
More dedicated bandwidth is provided on the dedicated server.

Considering these differences, if you decide to buy a virtual server, you can rent an Iranian virtual server or buy a Canadian virtual server, depending on your needs.

Is it time to upgrade your hosting?

First, you need to determine how much CPU, RAM, and storage space you need and how much traffic your website receives per month. If you have a large business that requires high hardware resources and your webmaster approves, use a dedicated server. But if your business is not large and you manage a small site that has enough resources for a dedicated virtual server, buying a virtual server is the best option. Virtual Dedicated Server offers you all the capabilities of a dedicated server at a limited price. In this way, you can also benefit from the expert advice of your hosting company and choose the most suitable server.

Hosting

What is a virtual server and what does it do?

What is a virtual server and what does it do?

Virtual Server VPS stands for Virtual Private Server. A virtual server is part of a complete dedicated server. This is done with virtualization. In this way, a server is divided into several sections that are used for different purposes. Due to the fact that the resources of a complete server are divided into several parts, often and under the same conditions, the cost of purchasing a virtual server is lower than a dedicated server. In this article, we will fully discuss the virtual server and explain its applications. Please stay tuned.

What are the uses of a virtual server?
Virtual server has many uses and it can be used many times. The following are some of them:

Hosting a relatively high-consumption website or a number of medium-consumption sites
Use a virtual server for web services such as mail server, database server and…
Use a virtual server to control or improve system performance
Use of virtual server as secondary communication agent and data encryption
Using the services of sites that have imposed sanctions on Iran. Of course, if the IP is abroad
Doing things that require high-speed Internet with high traffic.
And dozens more…

Explain the process of preparing a virtual server
Depending on the technology and structure of virtualization, virtual servers are usually derived from one or more dedicated servers. Typically, multiple virtual servers are derived from a single dedicated server. To do this, virtualization requires an agent (virtualization software). Virtualization systems are available for free or for different operating systems, depending on their type and function. The server also needs to support virtualization technology. There are a number of specific solutions for creating a virtual server as Local or Public. For example, for each virtual server on the web, at least one IP must be considered in order to register it on the network. Non-virtualization systems can be configured individually or shared for each virtual server based on the number of CPU cores allowed, the amount of virtual RAM, the amount of hard disk volume, and so on. Dedicated or shared resources means that each server has the right to access resources in a completely dedicated way or can use shared resources in a shared way. Usually in shared mode, high quality and performance can not be expected. In the following, we will mention some of the virtualization technologies and operating systems supported by it.

Virtuozzo virtualization model
OpenVZ virtualization model
VMware virtualization model
Xen virtualization model
KVM virtualization model
And …

Each of the virtualization models has one or more special features that you can research….

Types of virtual servers
Virtual servers are usually categorized based on operating system, virtualization model as well as its technology. The following are the types of virtual server categories:
Linux virtual server (with the possibility of installing a variety of Linux distribution operating systems)
Windows Virtual Server (with the ability to install most Windows server operating systems)
Dedicated virtual server (with completely dedicated resources such as CPU, RAM and…)
Shared virtual server (with shared hardware resources)
Virtual cloud server (with a different structure to increase the level of performance, stability, security and…)
There are other categories that were mentioned as the most important and widely used.
Hosting

VPS Hosting A-to-Z Guide

VPS Hosting A-to-Z Guide: How It Works, How to Choose & Best VPS Deals

When it comes to web hosting there are many different options available. Each has their own merits, features and price points, but today we’re going to be taking a closer look at VPS hosting.Virtual Private Servers allow you to store all files and data for your website on webspace that has been configured to look and feel like a standalone dedicated server.

 Table of content (Quick link)

  • What is virtual private server (VPS) hosting
  • Shared vs VPS vs dedicated hosting
  • When is the right time to switch to VPS
  • Tips on selecting the right VPS host
  • Best VPS hosting providers
  • Where to get free VPS hosting
  • Other important things & wrap Up


 FTC Disclosure

WHSR receive referral fees from some of the companies mentioned in this article. It takes lots of effort and money to create useful content like this – your support is highly appreciated.


What Is Virtual Private Server (VPS)

VPS stands for Virtual Private Server. A VPS hosting is a server, with its own copy of operating system and allocated server resources, within a bigger server.

How does VPS hosting work?

As the name implies, the entire aspect of VPS hosting is virtual. Virtualization technology is the means in which one powerful service is divided into multiple virtual servers. You can take it like you have a one piece of physical hardware that functions as separate servers.

Even though the physical server is shared, there is the element of privacy with services. The virtual server you are using will be reserved only for you. You won’t have to share your CPU, RAM or any other data.

What is VPS hosting? The biggest difference between a shared and VPS hosting is how server resources are being shared. Note that dedicated server resources (such as RAM and CPU power) are allocated to each VPS slice.
The biggest difference between a shared and VPS hosting is how server resources are being shared.

From a user point of view, a VPS host means:

    • Guaranteed performance – as you’ll get your own dedicated resources (CPU, RAM, storage, bandwidth, etc);
  • Better site security – your websites will be hosted in an isolated environment, what happen to your neighbor will not affect you; and
  • Complete server root access – it’s like hosting on a dedicated hosting.

Advantages of VPS hosting

VPS hosting is the perfect balance of price, performance, security, affordability, and privacy. Some of the amazing benefits you will get by using the services are;

  1. Shared cost of services
  2. Quick server setup
  3. Better server access with more control
  4. Private environment in which VPS server works
  5. Similar level of services as with a dedicated server


Shared vs VPS vs Dedicated Web Hosting

Some might get a little confused because of the multitude of choices when it comes to shared, dedicated and VPS hosting. Let’s take a closer look and perhaps, do a little comparison for better understanding.

Shared Hosting

Shared hosting is like sharing a room with others.

Shared hosting is like you are living in a room with a lot of friends. It means you must fit in the same room and you must split the cost of several things because it is affordable and cheap. However, several individuals are sharing the same space, it means everyone needs to live within a space with restricted resources among them. You will have to use the same things (that sounds a little unhygienic).

There are many website owners who prefer to use shared hosting services for the simple reason that it is easy to manage and affordable. Hosting service providers will take care of the server maintenance, so the web owners only need to focus on their site.

However, shared resources sometimes can have unforeseen circumstances, such as one website getting overloaded and hogging all resources on that server. This will affect the performance of other websites hosted together with it, until the hosting company resolves the issue.

 Shared hosting providers: Hostinger, Interserver, HostPapa, GreenGeeks , JujuHost

VPS Hosting

VPS hosting is like an apartment complex.

VPS hosting is like you are living in an apartment complex. It means that other people are living in the same building, but you have your own secure apartment. You will get more room and restrictions will be fewer as compared to living in a dorm. It also means that if your neighbour is misbehaving, it is the problem of owner of building, not yours.

Similarly, in the case of VPS, there are several users that are using the same server but they are isolated from each other. It means that no one will be affected by how much resources another is using. You will get the speed and security that you need without compromise. It is almost a perfect scenario because you will get the benefits of a private server with shared cost of services.

 VPS hosting providers: InMotion Hosting, SiteGround, TMD Hosting, BlueHost

Dedicated Hosting

Dedicated server hosting is like a bungalow.

Dedicated server hosting is like being the owner of a house. You are free to move anywhere within your property that you like. however, you will have to pay for the mortgage and bills that can be expensive.

Similarly, in a real dedicated server, you will pay for the entire server that is not shared with anyone else. You will get complete control over all services. Unfortunately, it is also the most expensive hosting option and needs some technical expertise to manage. It is commonly used by those who have websites with specific scenarios, most commonly extremely high traffic and tight security requirements.

 Dedicated hosting providers: A2 Hosting, M3 Server, Hostgator, Altus Host


VPS Host: When is the right time to switch?

It’s time to upgrade to VPS when…

1. You need speed

When you add more content to your website, its speed will likely slow down after some time. This is especially true for websites that rely on database-intensive operations. If you notice increasingly long process times, it’s time to contemplate an upgrade in plan.

Further, most websites will see increased traffic over time. Popular sites mean much higher traffic rates, which is fantastic for you. However, it means that your existing plans will likely not be able to manage that volume of traffic. Upgrading to VPS hosting is the next logical step for you at this point.

KnownHost speed feature
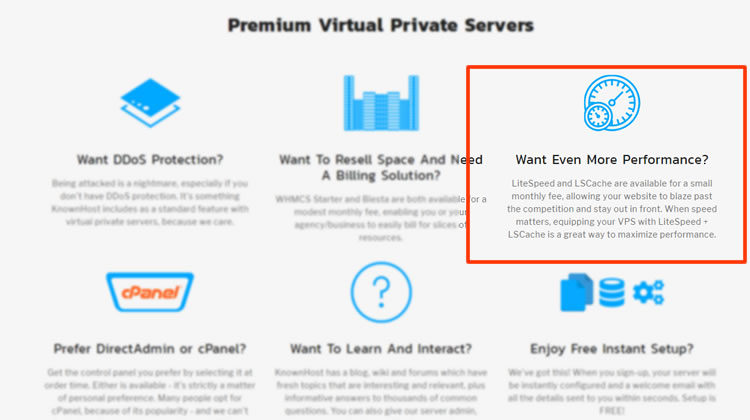
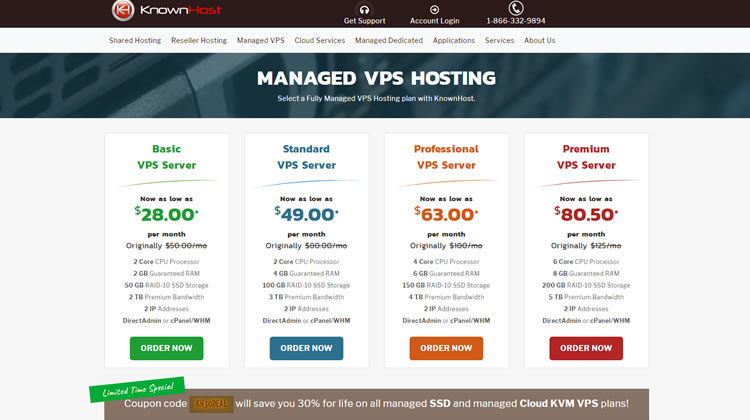
Example: Some Managed VPS hosting services come with extra speed features. KnownHost VPS (see image) users can optimize their web host with built-in LiteSpeed (+$20/mo) and LS Cache (+$6/mo) at reasonable fees.

2. Lack of resources

Continuously getting 503-server errors most probably means that your services are not available to your visitors and customers as well. It means that you do not have enough memory on your server (again, likely due to your neighbours hogging the resources). It’s time to move to VPS hosting.

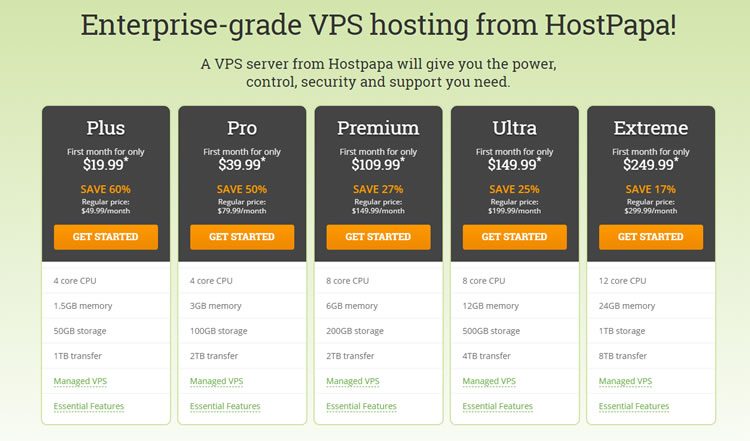
Example:  VPS hosting users get dedicated server resources for their websites. HostPapa VPS Hosting (see image), HostPapa VPS Plus users are guaranteed with 1.5 GB RAM and 4 core CPU.

3. Increased security concerns

If you’ve become unlucky enough to have gotten onto a server which is facing multiple attacks against another site hosted there, things can be tough. Under this scenario, you’ll have to rely on the good graces of your host to manage the situation, or alternatively, switch to VPS to get around it.

4. Special operating system (OS)

With full root access (that usually comes with unmanaged VPS hosting plans), you are able to install and customize any software that you need to optimize your hosting experience. This is flexibility is especially valuable when you need to install a custom operating system.

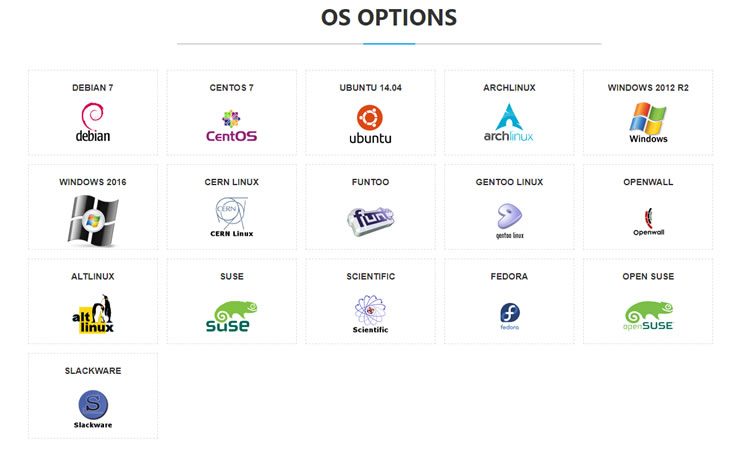
Example: InterServer Managed VPS Hosting offers 16 operating system options; including Debian, CentOS, Ubuntu, Gentoo, Open Wall, Fedora, and Slackware.

 More help: Step-by-step guide on switching web hosts


Tips on Selecting the Best VPS Hosting Provider

There are thousands of service providers available online – Choosing the best one can be tough.

Let me share with you some of the things you must consider before making a decision and spending that extra money.

Consideration factor #1: Live customer support

I’ve always stood firm on the point that customer support is a make or break deal with any sort of service provider. Your VPS host needs to at least some form of all-day, everyday support. It can be via live chat or a ticketing system, but customers always need to feel as if the host has their back.

AltusHost – 24×7 technical support via live chat and social channels (visit online).
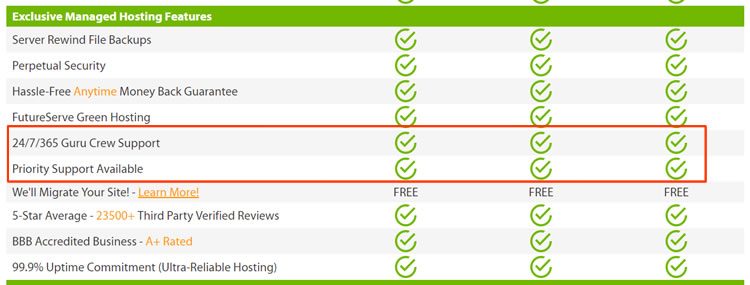
A2 Hosting – VPS users get priority support from the company expert crews (see offer details).

Consideration factor #2: Cost

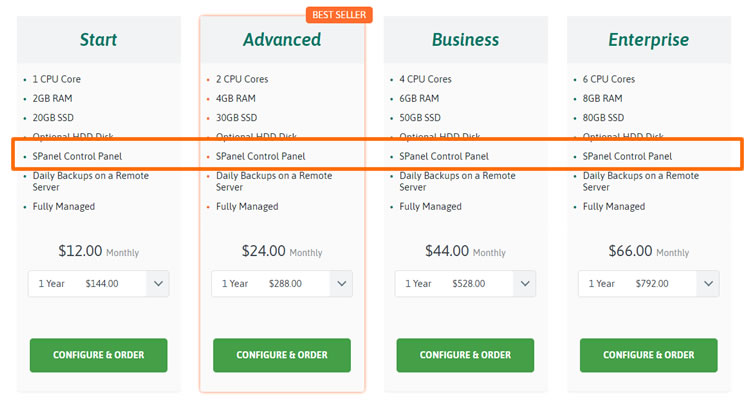
Keep firmly in your mind the sort of assets that you require to serve your site(s) when seeking a host. Cost in a VPS is important, but not as key as you might think. VPS resource availability is scalable, so the cost that needs to be looked at is comparable cost from one host to the next. Also – as cPanel revised their pricing model recently, web hosting companies across the board will have to pass those costs on to users sooner or later. You will need to consider the cost of control panel when selecting a VPS plan. Companies like ScalaHosting has developed their own control panel to mitigate this issue – so their users would have little issues with the price hike.

scala spanel
Developed in-house by ScalaHosting, sPanel  is compatible with cPanel and will save you $15 per month for a cPanel license.

VPS pricing: How much to pay?

VPS Host CPU Cores Memory Storage Dedicated IP Control Panel Price*
AltusHost 2 4 GB 80 GB CentOS €39.95/mo
BlueHost 2 4 GB 60 GB 2 cPanel/WHM $24.99/mo**
DreamHost 2 4 GB 120 GB DreamHost CP $27.50/mo
JujuHost 4 4 GB 125 GB 2 cPanel Solo $78.99/mo
InMotion 1 6 GB 150 GB 4 cPanel/WHM $29.99/mo*
Interserver 4 8 GB 120 GB Webuzo $24.00/mo
KnownHost 2 2 GB 50 GB 2 Direct Admin $28.00/mo
Scala Hosting 1 2 GB 20 GB 1 SPanel $12.00/mo


** / * Introductory price. InMotion VPS plan renews at $99.99/mo; BlueHoust VPS plan renews at $59.99/mo.

Consideration factor #3: Reliability and hosting performance

Check how much uptime your host guarantees. Uptime in a shared services environment is often laxer than should be expected in a VPS environment.

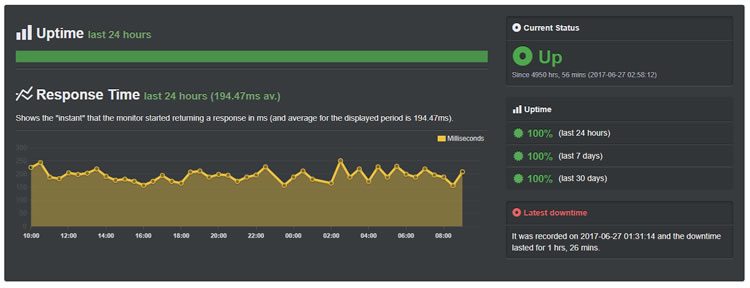
You’re paying more, so there SHOULD be a minimum uptime guarantee and better server speed. Look for a host that offers 99.5% at a very minimum, although ideally, I’d rather go with someone who offers 99.9%. Search through some reviews as there are many who have put this to the test. For example, any of WHSR’s many web host reviews include an uptime record as one of our key tests.

Example: This site you are reading is hosted on InMotion Hosting VPS. Image shows WHSR uptime records for Dec 2017 / Jan 2018 – No outages were recorded during this period (see offer details).
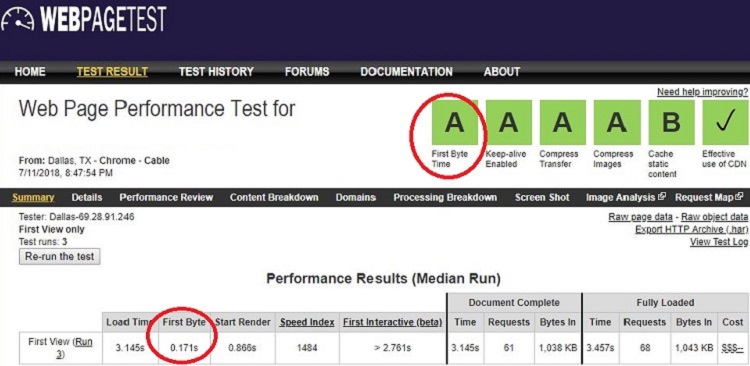
InMotion VPS hosting speed test – TTFB = 171ms.


Best VPS Hosting Providers to Consider

1- InMotion Hosting

 Visit: InMotionHosting.com . Price: From $24.99/mo

Inmotion hosting vps plans

Quick review: InMotion Hosting is highly recommended due to two reasons – one, strong server performance data (>99.95% uptime, TTFB <450ms); and two, solid customer service. I personally pay them hundreds of dollars every year to host this site you are reading.

Learn more in our InMotion Hosting review.

Notable VPS features

  • cPanel license is free with enterprise-grade CentOS
  • The cloud infrastructure will power Real-time redundancy
  • Server management is free for updates and patches
  • SSL and SSDs certificate is free for secure and fast hosting


2- A2 Hosting

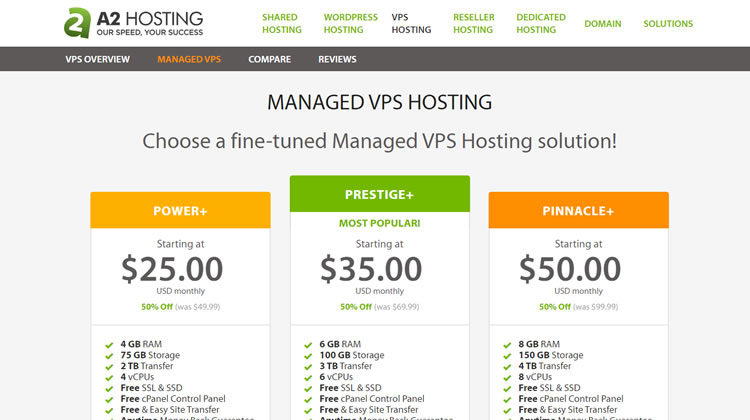
 Visit: A2Hosting.com . Price: From $25.00/mo

a2 vps hosting plans

Quick review: The best thing about A2 Hosting is speed. By introducing SSD storage, Railgun Optimizer, and pre-configured server caching to its shared hosting users, A2 is raising the speed standard of the entire hosting industry. By all accounts, A2 Hosting is definitely worth signing up if you don’t have a web host.

Learn more in our A2 Hosting Review.

Notable VPS features

  • cPanel available
  • Choose your Linux OS
  • Root access available
  • SSD Storage


3. KnownHost

 Visit: KnownHost.com . Price: From $28.00/mo

knownhost vps hosting plans

KnownHost managed VPS hosting service is reliable, reasonable priced, and relatively simple to setup. All VPS hosting plans come with full SSD storage, built-in backups and 2 dedicated IP addresses – which make them a perfect choice for businesses who are looking for a worry-free VPS hosting solution.

Learn more about KnownHost performance and features at HostScore.

Notable VPS features

  • cPanel/WHM or Direct Admin
  • Built-in backup and speed optimization
  • Root access available
  • 2 dedicated IP address included


4. HostPapa

 Visit:  Hostpapa.com . Price: From $19.99/mo

hostpapa vps hosting plans

Quick review: We like HostPapa for its low signup price and feature-rich shared hosting plans. The expensive renewal price and below 99.9% uptime record is an issue for now. If for some reason you want your website to be hosted in Canada, then HostPapa is definitely one of the best choices.

Learn more in our HostPapa review.

Notable VPS features

  • cPanel available
  • SolusVM VPS panel
  • Root access available
  • Full SSD Storage


5. AltusHost

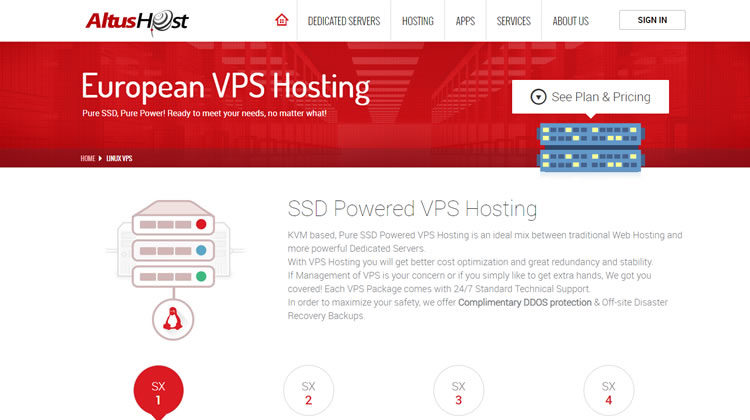
 Visit: altushost.com  . Price: From €19.95/mo

altushost vps hosting plans

Quick review: AltusHost is a well-known premium hosting provider based in Netherlands. The company provides rock-solid customer support and offer three different server locations in Europe (Bulgaria, Netherlands, and Sweeden). We think AltusHost may be the right call for small businesses and individual bloggers who want a reliable EU-based hosting solution.

Learn more in our AltusHost review.

Notable VPS features

  • 2 to 8 GB RAM with full server root control.
  • Fast delivery time – provisioning in 2 – 24 hours.
  • DDoS (10 Gbit/s) protection included.


6. SiteGround

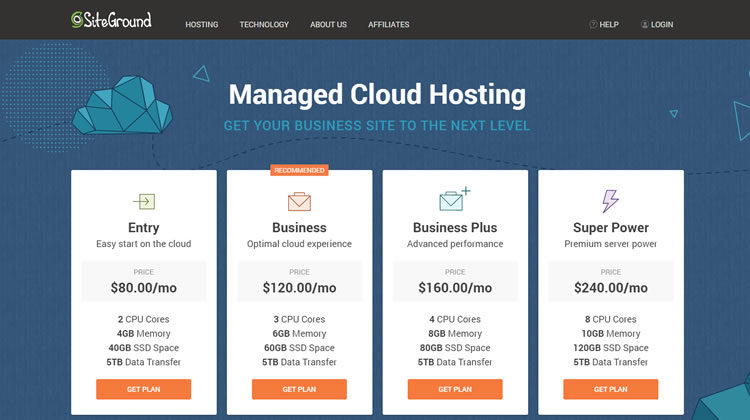
 Visit: Siteground.com  . Price: From $80/mo

siteground hosting vps

Quick review: SiteGround is a solid hosting company with innovative server features and top class live chat support. Their price is a little steep at renewal but you’ll get what you paid for. We think SiteGround is suitable for both new and experienced users who want a worry-free hosting solution.

Learn more in our SiteGround review.

Notable VPS features

  • Scalable resources
  • 24/7 VIP support
  • Free CDN
  • Multiple locations available


Free VPS Hosting: Where to Find Them?

Here are some free VPS hosting we found online.

Free VPS Providers Storage Memory Credit Card? Support?
5 Jelly 20 GB 1 GB
Ohosti 25 GB 512 MB
InstaFree 5 GB 256 MB
Guhat 15 GB 512 MB


Free VPS hosting is not as powerful and robust as the paid one.

Security is usually a major issue when you are using a free platform. Imagine hosting your sites alongside with spammy / outdated / unmanaged sites – you never know when these neighbors are going to cause troubles (even though you are on VPS).

So are customer support and performance. You can’t ask for high level support and topnotch server performance when you are not paying any amount of money, right?

But then again, these VPS plans are FREE. They fit the needs of certain web owners – especially for users who are developing a web application or users who want a taste of VPS hosting before going for the paid options.


Other Important Things to Know About VPS Hosting

1- Managed vs Unmanaged VPS Hosting

comic server management

If you’ve ever used a computer on your own (yes, this might sound strange, but there’s a reason for it) then you’ll probably know what it’s like to use unmanaged VPS hosting.

In both situations, you’re responsible for the setup and maintenance of all programs which run on the system.

Unmanaged VPS

With an Unmanaged VPS, your hosting provider has only two responsibilities – making sure your VPS is running and that it’s connected to the network. As you can imagine, this may take a little technical expertise on your part to handle.

Managed VPS

In a Managed VPS environment, you can sit back, relax and let your host know whatever you’d like done. There are no security issues to be concerned about, not function-specific tasks you’ll need to handle. Your host will manage everything for you and solve any issues that crop up.

2- VPN vs VPS: What’s the Difference?

To be honest, there is not much of a similarity.

What is a VPN?

A VPN is a private network (ie. ExpressVPN and NordVPN) which most people use to keep secure and private on the Internet.

What is a VPS?

A VPS on the other hand is a virtual serve you can use like a dedicated server to host your website or manage other web-related tasks, such as setting up Cloud Storage, hosting email or such. The two are similar in acronym only.

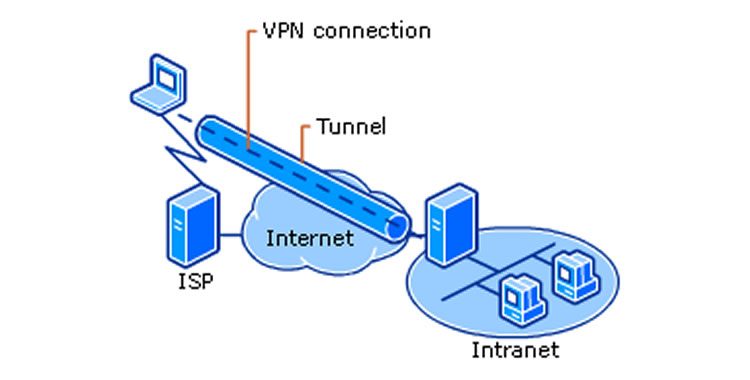
Simple illustration: How VPN works (image source: Microsoft).

Here comes the but – I include this segment because you can use a VPN to connect to a VPS server and manage it. The VPN will keep your connection private and untraceable, so you can sign in to the VPS without anybody knowing otherwise.

Some VPNs offer fixed IP addresses, and that gives many users an advantage since almost all ISPs make use of dynamic IPs for their customers. By using a VPN with a fixed IP, you can choose to only whitelist your IP in managing the VPS, making it much more secure.

Also – check out this list of best VPN services.


The Bottom Line

The average VPS is more expensive than shared hosting, but this is not always true. When considering whether you need to move to a VPS host, I would rather you focus on whether you’re able to manage a VPS account.

True, there are some that come managed, but the level of technical knowledge needed is different from regular shared hosting. It’s not insurmountable, but your key business is in your website. Do you want to spend the extra time learning to manage your VPS account?

The flip side is scalability. Once you’ve gotten the hang of it, users of VPS hosting have an easier time in two ways. A) It’s easier to scale up and there are multiple tranches, so your cost of running a website increase slowly and B) it’ll give you a technical edge when your site has grown so large you need to move to a dedicated server.

 Relevant Resources

We have also published a number of actionable guide and helpful hosting reviews for those who are searching for a web host.

  • Full list of hosting providers we reviewed
  • Guide: Problems & solutions with cheap web hosting
  • Guide: Switching from HTTP to HTTPS (SSL)
  • How to host your business email accounts
  • How to purchase a new or existing domain name
  • How to transfer a web host with no down time
  • List of best hosting services we recommend


Hosting

How to manage WebHost Manager packages

How to manage WebHost Manager packages

This article describes how to use WebHost Manager (WHM) packages. Packages are collections of predefined settings that WHM uses when you create an account. For example, as a reseller you could create “Basic” and “Premium” packages. The “Basic” package might have relatively small quotas for disk space and bandwidth transfer, while the “Premium” package has higher limits.

After you have created at least one package, you can create an account.

CREATING A PACKAGE

To create a new package in WebHost Manager, follow these steps:

  1. In the search box at the upper left of the WHM screen, start typing Package, and then click Add a Package when it becomes visible.
  2. In the Package Name text box, type a name for the package. For example, you could create settings for a basic account and name the package Basic.
  3. Under Resources, set quotas and limits for the various options.
    You cannot use unlimited amounts for the Disk Quota and Monthly Bandwidth resources. Instead, set specific limits.
  4. Under Settings, select the check boxes for the options you want to enable for the package.
    Make sure you select the Shell Access check box if you want to allow customers to access their accounts using SSH.
  5. In the cPanel Theme list box, select the cPanel theme for accounts using the package. Please note that the default theme for cPanel accounts is “paper_lantern.”
  6. In the Feature List list box, select the feature list to use for the package, or accept the default value.
    Feature lists control which feature icons cPanel displays in customer accounts. For more information about how to configure feature lists using the WHM Feature Manager, please see this article.
  7. In the Locale list box, select the language locale.
  8. Click Add. WebHost Manager creates the package.
    There is an LVE settings shown at the bottom of the package creation screen. LVE settings made there have no effect unless you have root privilege.

EDITING A PACKAGE

To edit an existing package in WebHost Manager, follow these steps:

  1. In the search box at the upper left of the WHM screen, start typing Package, and then click Edit a Package when it becomes visible.
  2. Select the package that you want to edit, and then click Edit.
    Package names use the format username_pkgname, where username is your A2 Hosting account username, and pkgname is the package name you specified when you created the package.
  3. Make the changes to the package. If you make a mistake, click Reset, and WebHost Manager resets the package values to their last saved state.
  4. When you are done editing the package, click Save Changes.

DELETING A PACKAGE

To delete an existing package in WebHost Manager, follow these steps:

  1. In the search box at the upper left of the WHM screen, start typing Package, and then click Delete a Package when it becomes visible.
  2. Select the package that you want to delete, and then click Delete. WebHost Manager deletes the package immediately.
    Package names use the format username_pkgname, where username is your A2 Hosting account username, and pkgname is the package name you specified when you created the package.

MORE INFORMATION

What Is Web Host Manager (WHM)?

WebHost Manager is a powerful, yet easy to use control panel used for the management of web hosting accounts on a server. WHM, a product developed by cPanel, is often used by Resellers to manage their account and their customers’ accounts.

WHM & Reseller Hosting

Reseller hosting is a service that makes it easy for users to launch essentially their own web hosting company. While a primary web hosting company is the one who actually sets up and maintains servers within their data center, a Reseller can simply rent space on the primary host’s server. In turn, the Reseller can divide up the space they are renting on the server into hosting packages that they can in turn sell to their own customers. Each of the Reseller’s customers, or end users, get access to their own cPanel account to manage their own web hosting accounts.

Reseller Hosting greatly reduces the barrier of entry for individuals or small businesses to sell web hosting, and WHM is the control panel that helps the Reseller manage their hosting company.

What Is The Difference Between WHM & cPanel?

WHM is more specifically a reseller hosting panel. cPanel, on the other hand, is the control panel that is used by each client to manage their individual hosting account. cPanel makes it easy for the end user to manage their website, files, databases, email accounts and so much more. In addition to being extremely user-friendly, even users who have never run a website before will find it easy to install software to their account with a program called Softaculous, found in their control panel. With Softaculous, they’ll be able to setup the most popular software whether it is WordPress, Joomla, Drupal or another solution with just 1-click.

WHM Features

As mentioned, WHM is the control panel that can help you manage your Reseller Hosting business. It is loaded with features that will make your life much easier. Here are a few of the features included within your WHM control panel:

  • Create the web hosting packages and allocate the resources that will be allocated to each package. You can create packages based on how many domains can be hosted, bandwidth and disk space. These are the packages that you can list on your website to sell to your visitors. You can also change and delete your created packages.
  • Create each individual hosting account (that will be managed by cPanel). WHM also gives you the ability to terminate the accounts if a customer cancels their account as well as suspend or unsuspend them as necessary.
  • Reset or manage passwords and email addresses for each of your end users’ accounts.
  • Upgrade or downgrade customers to different hosting packages.
  • WHM makes it easy for you to track down customer information. Use WHM to search for a customer based on a number of specific criteria including bandwidth usage, suspended accounts, domains and much more.
  • DNS management is a breeze with WHM! Add, delete and edit DNS zones.
  • SSL Certificates are a must for most sites. WHM gives you the ability to generate an SSL Certificate for your customer as well as help you to install it.


CHEAP VPS

Hosting

WHM (WebHostManager) Reseller Series Flash Tutorials

WHM (WebHostManager) Reseller Series Flash Tutorials

Hosting

Telnet Definition

Telnet Definition

Telnet Definition Telnet Definition[/caption]

What is Telnet?
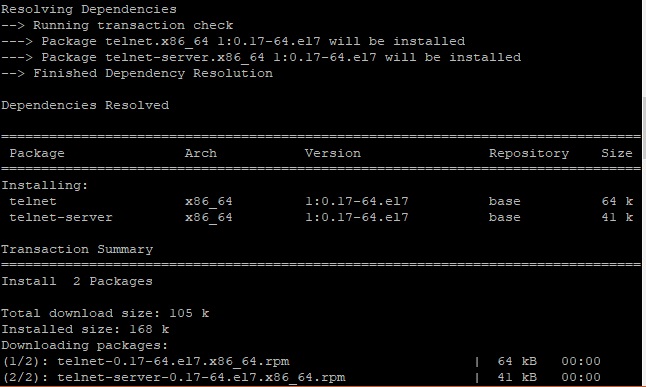
Telnet is a user command and an underlying TCP/IP protocol for accessing remote computers. Through Telnet, an administrator or another user can access someone else’s computer remotely. On the Web, HTTP and FTP protocols allow you to request specific files from remote computers, but not to actually be logged on as a user of that computer. With Telnet, you log on as a regular user with whatever privileges you may have been granted to the specific application and data on that computer.A Telnet command request looks like this (the computer name is made-up):

telnet library.jujuhost.com

The result of this request would be an invitation to log on with a userid and a prompt for a password. If accepted, you would be logged on like any user who used this computer every day.

Telnet is most likely to be used by program developers and anyone who has a need to use specific applications or data located at a particular host computer.

Hosting

Compare OpenStack Hosting

Compare OpenStack Hosting

If your business is interested in creating its own cloud storage or computing center, OpenStack is probably on your list of tech to review. In this article we’ll explain what you’ll need and recommend the best hosting providers for this application.

OpenStack lets you create your own “clouds” on the internet. With it, you can distribute computing, storage, and networking over any number of computers from a single interface. Making OpenStack work will require that you have fairly technical knowledge. Make sure any host you use doesn’t have a problem with OpenStack.

You can read a detailed breakdown of each host later in this article, but if you’re in a hurry, here’s a preview of the best 5 hosts for OpenStack:

  1. LiquidWeb – Good VPS plans with “heroic support”
  2. Cloudways
  3. DigitalOcean
  4. Rackspace Cloud
  5. FastWebHost
  6. JujuHost

How Did We Pick the Best Hosts for OpenStack?

We’ve reviewed over 380 hosting providers along with 1,500+ hosting plans and selected the ones which meet all the technical requirements for running OpenStack. We then shortlisted the hosts which offer the highest levels of customer service.

Lastly, we used our enormous database of over 1 million words of genuine customer reviews to identify the top 10 hosts for OpenStack.

What is OpenStack?

OpenStack is a system for creating clouds. It provides a single interface to allow the user to distribute computing, storage, and networking over a number of computers.

What is different about OpenStack is that it is an open source solution that allows individuals and groups to create their own clouds.

This is important because in the past, when companies wanted to create their own clouds, they had two choices. Some, like Twitter, built their own clouds. Most, however, chose to use other company’s proprietary clouds. For example, Pinterest uses Amazon Simple Storage Service (S3) for all its storage needs.

While Amazon’s cloud computing options make heavy use of Linux, as the rest of the web hosting industry does, OpenStack is completely open source. You’re not stuck with anyone’s service. You can use a public cloud while being able to set up your own private clouds if you want.

You can mix and match different components: computing, storage, networking, whatever you want. It’s like cloud computing Lego.

Hosting

How to Change PHP Settings in your Hosting Account

How to Change PHP Settings in your Hosting Account

PHP is a scripting language used primarily on the web and is available on our shared, VPS, and Dedicated servers. PHP is highly customizable and has many settings that our users can modify themselves. This article will advise you how to change PHP settings in your php.ini file.

How to view your current PHP settings

To view your current PHP settings, create a PHPinfo page. If you’re not sure how to do this, please see How can I view my PHP settings using a PHPinfo page ?

The steps in updating the values listed in your PHP info page depend on how PHP is setup on your particular server. In general, PHP runs on our servers as either:

  • Apache module
  • CGI Module

To find out how PHP is configured on your server, create a PHP info page (via the above instructions) and look at the “Server API“‘ value. If the “Server API” is CGI“, then PHP is running as “CGI module”. If “Apache” is listed, then your server is running PHP as an “Apache module”.

Server API: Apache

If your server runs PHP as an “Apache module“, you can change your PHP settings via a .htaccess file. A .htaccess file is a configuration file you can create and use to change many server settings, including PHP settings. The basic syntax to use in your .htaccess file for updating PHP settings is:

php_value Directive value

For example, if you wanted to change the max_input_time from 60 seconds to 120 seconds, add the following to your .htaccess file:

php_value max_input_time 120

After making this change, refresh your PHP info page, and you should see the changes. If you receive a 500 error, please double check the syntax you used as you may have made a misspelling.

If you don’t have a .htaccess file, you can simply create a new file named .htaccess. As the .htaccess file begins with a dot (.), it is considered a hidden file. If you are using the cPanel’s File Manager, please be sure to select the option to Show Hidden Files (dotfiles), otherwise you will not be able to see your .htaccess file. If you do not see this prompt when opening your File Manager, click the, “reset all interface settings” link at the bottom of your cPanel to reset your File Manager settings.

Server API: CGI

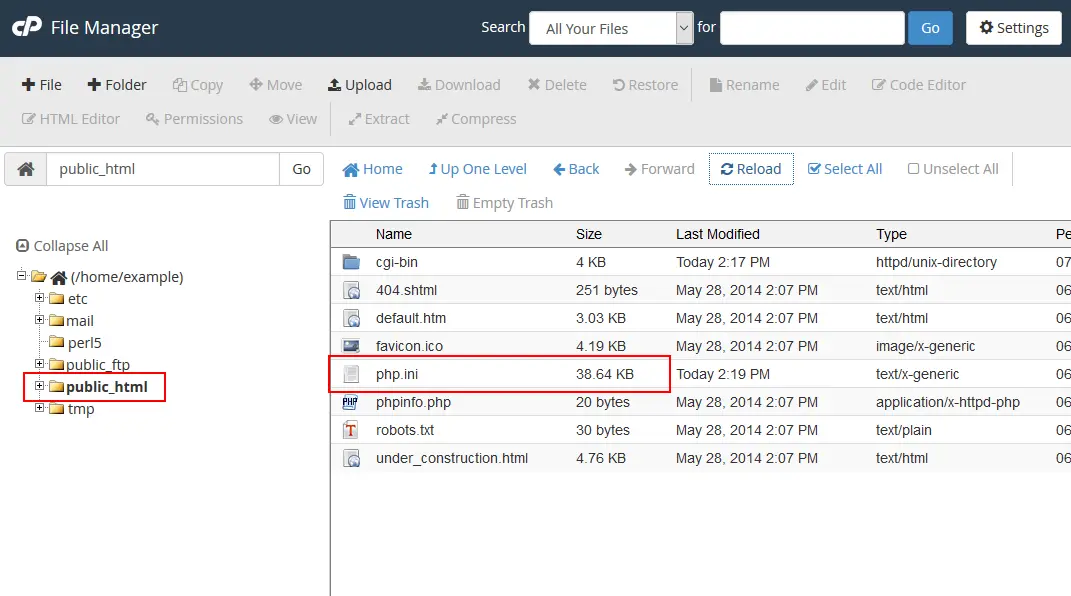
the-php-temporary-directory-is-not-set

View of the php.ini in the File Manager

If your server runs PHP as a CGI module, you can change your local php.ini file in order to make modifications to your PHP setup. php.ini is a PHP configuration file with a list of PHP directives and their values. In the above example, we modified the max_input_time value. If you open your php.ini file and search for max_input_time, you should see something similar to:

;;;;;;;;;;;;;;;;;;;
; Resource Limits ;
;;;;;;;;;;;;;;;;;;;
 max_execution_time = 30
max_input_time = 60
memory_limit = 256M
upload_max_filesize = 10M

To change the max_input_time from 30 seconds to 120, for example, simply change 30 to 120 and save the file. Refresh your PHP info page, and you should see the changes.

Increasing PHP memory in the php.ini

A common issue when using free open source software or other PHP intensive programs is the “exhausted memory” error. If you have a PHP memory error on your site, you can increase the memory limit PHP uses for the scripts. To learn how to change the memory limit in your php.ini, please see the following link.

Fixing the Allowed memory size exhausted error

Modifying the PHP.INI file

Here is a quick step-by-step tutorial on editing the PHP.INI file.

  1. Login to the cPanel.
  2. File Manager in the cPanel

    Find the File Manager in File section of the Cpanel. Review our tutorial on using the Code Editor within the File manager if you’re looking on information how to use it.

  3. File Manager icons

    Navigate to the directory where you will either save or edit the PHP.INI file and then select the file and use the Code Editor. To open the file, you can click on it to select the file and then click on the Code Editor icon in the menu bar of the File Manager. You can also right-click with your mouse and select Code Editor from the menu that appears.

  4. Edit the section of the PHP.INI that you wish to change.
  5. Click on SAVE CHANGES in the top right hand corner in order to save your modifications or additions to the file.

Common Problems when Updating your php.ini file

I don’t have a php.ini file!

Only users running on a server with PHP loaded as a “CGI module” will have a php.ini file. The php.ini file by default will be located at public_html/php.ini. If you do not see a file named php.ini in your public_html, please contact our Support Department and request that we create one for you.

I made changes to the php.ini file, however I do not see the changes!

The php.ini file is not recursive. Updating your php.ini values in public_html/php.ini will not affect PHP files in subfolders of your public_html, such as public_html/staff. To correct this problem, you can make your php.ini file recursive so that it affects all sub folders. More help on this can be found in How can I make my php.ini file recursive?

Considering a VPS or Dedicated Server?

With a VPS or dedicated server, a site owner can truly customize the server to their exact specification. If you are on a Shared Hosting account, and are thinking about upgrading from to a VPS or dedicated server, click here to read more about a VPS vs dedicated server.

This entry was posted in PHP and tagged PHP phpinfo.php local php settngs changing php settings recursive php.ini phpinfo suPHP_ConfigPath what version php do I have. Bookmark the permalink.